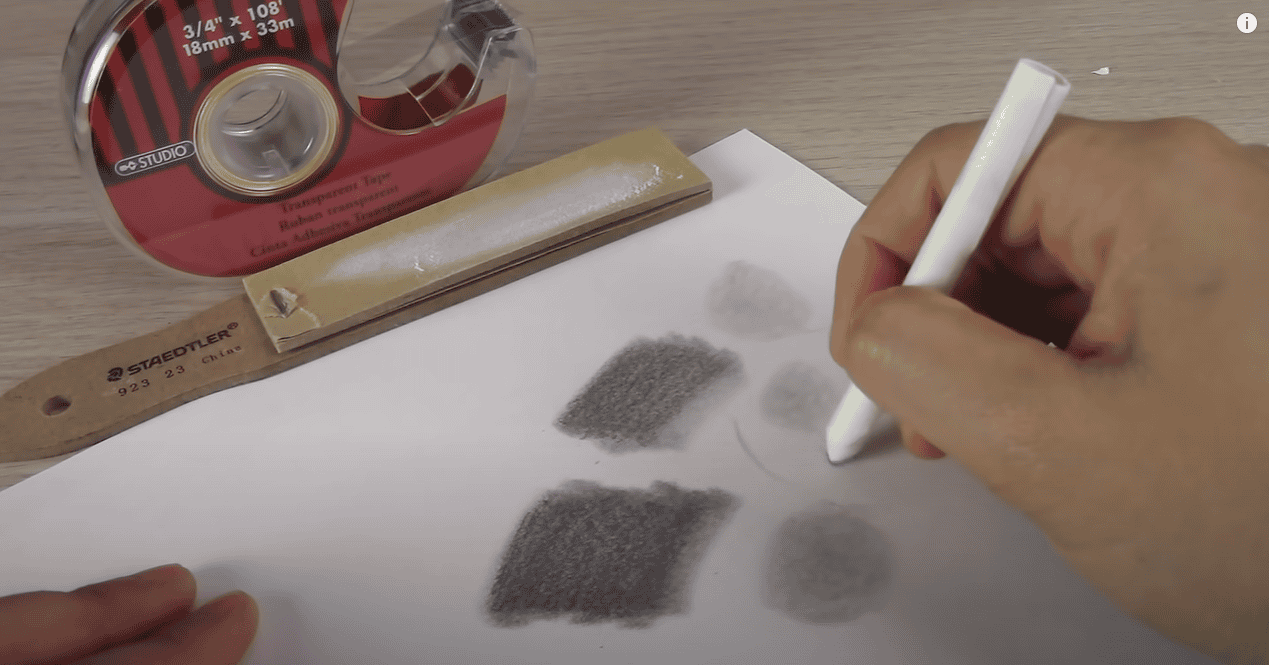
In the realm of art, a multitude of tools exist, each serving its unique purpose. Today, our focus is on one such tool—the stumping tool, often referred to as a blending stump or tortillon. This article is an extensive guide that dives into the stumping tool’s use, techniques, and care.
Understanding the Stumping Tool
Before we delve into the mechanics of using a stumping tool, it’s essential to understand what it is. A stumping tool, or blending stump, is a cylindrical drawing tool, tapered at the ends, made from compressed paper. They are invaluable for blending and smoothing drawings, typically those created with graphite, charcoal, or pastel.
Differentiating between a Blending Stump and a Tortillon
Though often used interchangeably, a blending stump and a tortillon are not quite the same. Here are the differences to guide you:
| Blending Stump | Tortillon | |
|---|---|---|
| Material | Compressed paper | Single sheet of rolled paper |
| Ends | Two pointed ends | One pointed end, one flat end |
| Sizes | Variety of sizes | Generally smaller |
| Blending | Better for larger areas | Ideal for smaller, detailed areas |
Techniques for Using the Stumping Tool
Now that we have a basic understanding of the tool, let’s delve into various techniques for using the stumping tool.
Layering
Layering is a fundamental technique in art that involves building up a composition by applying successive layers of color or tone. When employing layering, it is advisable to begin with lighter strokes and progressively work towards darker layers. This method provides artists with enhanced control over the blending process, resulting in a more nuanced and cohesive final piece. By following this approach, artists can achieve a sense of depth, dimension, and realism in their work. Some key points to keep in mind when using layering include:
- Begin with lighter strokes and gradually increase the intensity of the colors or tones;
- Build up the layers gradually, allowing each layer to dry or set before applying the next one;
- Use different brush techniques, such as dry brushing or glazing, to achieve desired effects;
- Experiment with different opacity levels of paints or drawing materials to create variations in texture and transparency;
- Pay attention to the composition’s overall values and ensure a proper balance between light and dark areas;
- Adjust the pressure and angle of the brush or drawing tool to achieve desired levels of coverage and texture.
Direction
When drawing or sketching an object, it is crucial to pay attention to the direction of your strokes. By following the contour of the object, you can effectively preserve its form and create a more realistic representation. If you’re drawing a rounded object, such as a sphere or a curved surface, it is recommended to make rounded strokes that mimic the shape. On the other hand, when depicting a flat object, like a tabletop or a book, utilizing straight strokes helps convey its flatness and maintain its visual integrity. Consider the following points when working with directional strokes:
- Observe the object carefully and analyze its shape and structure before starting your drawing.
- Identify the primary contours and lines that define the object’s form;
- Align your strokes with these contours, using the direction of the lines as a guide;
- For rounded objects, use curved strokes that follow the curvature of the form;
- For flat objects, employ straight strokes that align with the object’s edges or planes;
- Adjust the length and thickness of your strokes to capture the subtleties and variations in the object’s surface;
- Experiment with different pressures and angles to achieve a sense of depth and three-dimensionality.
Pressure
The application of varying pressure during the artistic process can significantly impact the visual outcome and texture of a work. Understanding how to manipulate pressure allows artists to create different effects and achieve desired results. When aiming for a smoother blend, it is advisable to apply more pressure to the medium, whether it be a brush, pencil, or other drawing tool. This increased pressure helps to distribute the medium more evenly, resulting in a seamless transition between colors or tones.
Conversely, when desiring a lighter blend or more delicate effect, reducing the pressure applied to the medium is key. This lighter touch enables finer lines, subtle gradients, and a softer overall appearance. Here are some key points to consider when working with pressure:
- Experiment with various levels of pressure to become familiar with the range of effects you can achieve;
- Practice controlling the pressure applied to the medium, gradually increasing or decreasing it as needed;
- Use heavier pressure when aiming for bold or solid areas, creating a denser application of color or tone;
- Employ lighter pressure for delicate details, highlighting, or areas that require a gentle touch;
- Be mindful of the medium you’re using, as different materials may respond differently to pressure;
- Explore the interplay between pressure and other techniques, such as layering or blending, to enhance your artwork further.
Cross-Hatching
Cross-hatching is a versatile drawing technique that involves the creation of intersecting sets of parallel lines, forming a mesh-like pattern. This method can be employed to add texture, shading, and depth to a drawing. By using a blending tool, such as a stump or tortillon, artists can further enhance the effect by smudging and blending these lines, resulting in a visually engaging texture. Here are some key points to consider when working with cross-hatching:
- Start by identifying the areas in your drawing where you want to apply cross-hatching for texture or shading;
- Use a pencil or pen to create sets of parallel lines in one direction. The spacing and thickness of these lines can vary depending on the desired effect;
- Overlay another set of parallel lines in a different direction, intersecting with the first set. The angle and density of the second set will affect the final appearance;
- Continue adding more layers of intersecting lines to increase the complexity of the texture or shading;
- Use a blending tool, such as a stump or tortillon, to gently smudge and blend the lines together, creating a seamless and cohesive texture;
- Experiment with different pressures, angles, and line densities to achieve a range of effects, from subtle textures to bold and dynamic patterns.
Feathering
Feathering is a valuable technique in drawing that helps create a smooth and gradual transition between a shaded area and a lighter area, resulting in a soft and subtle effect. This method is particularly useful when aiming for a gentle gradation of tones or when transitioning from shadows to highlights. To achieve feathering, artists often utilize a blending tool, such as a stump or tortillon, to gently blend out the edges of the shaded area towards the lighter area. Here are some key points to consider when working with feathering:
- Identify the areas in your drawing where you want to create a soft transition between the shaded and lighter areas;
- Apply the desired shade or tone to the shaded area using light, even strokes;
- Take the blending tool, such as a stump or tortillon, and gently drag or blend the edges of the shaded area towards the lighter area;
- Use a light touch and gradually increase the pressure as needed to achieve a seamless transition;
- Blend the shaded area with short, light strokes in the direction of the transition, ensuring a smooth and even fade.
Cleaning and Care of the Stumping Tool
Just like any other art tool, stumping tools require proper care to maintain their effectiveness. Here’s how you can keep your stumping tool in top shape:
- Regular Cleaning: Use a piece of sandpaper or a sandpaper pad to clean the stumping tool. Gently rub the dirty end of the stump on the sandpaper in a circular motion;
- Shaping: You can also use sandpaper to shape the stump. If you want a sharper point, for instance, rotate the stump at an angle against the sandpaper;
- Storage: Keep your stumping tools in a dry place to prevent them from absorbing moisture, which could damage the paper;
- Repurposing: Don’t throw away your old stumps. You can assign different stumps to different materials, like graphite or charcoal, to avoid cross-contamination.
Pro Tips for Using the Stumping Tool
Here are some additional tips to elevate your experience with the stumping tool:
- Always start with a clean stump when working on a new drawing or switching between materials;
- Use the larger end of the stump for blending larger areas and the smaller end for more detailed areas;
- Control the level of blending by adjusting the pressure you apply;
- For darker areas, load the stump with material from your drawing medium before blending;
- Don’t overuse the stump. Sometimes leaving areas unblended can create a striking contrast and add depth to your piece.
Common Mistakes to Avoid
While using a stumping tool can be straightforward, it’s easy to fall into some common traps. Here are a few mistakes to avoid:
- Overblending: While it can be tempting to blend everything smoothly, overblending can cause your drawing to lose texture and depth;
- Neglecting Cleaning: If you don’t clean your stump regularly, it can get loaded with too much material and become less effective at blending;
- Ignoring Light and Shadow: Remember to consider the light source when you’re blending. This will help you maintain the right contrast in your drawing;
- Using Wrong Size: Using a stump that’s too large for a small area can lead to a lack of precision. Conversely, a small stump may not blend larger areas effectively.
Conclusion
Mastering the use of a stumping tool can greatly enhance your drawing skills, allowing you to create smooth transitions, add depth, and bring a sense of realism to your work. It’s a tool that requires practice, patience, and an understanding of its proper care and usage.
Remember, while blending can help smooth out your artwork, knowing when to leave some areas unblended is equally important to create balance and contrast. The journey to mastering this tool is one of trial and error, so keep practicing, keep learning, and keep creating.
In the vast and colorful world of art, a stumping tool is a simple yet powerful weapon. It’s not just a tool for blending; it’s a tool for bringing your vision to life. So, grab your stumping tool and let your imagination take flight.